Showing posts with label handmade. Show all posts

Friday, March 7, 2014

A Swap Just For Mama

Not very often do I get a chance to have a surprise from a complete stranger arrive in my mailbox full of amazing goodies just for me. So when I heard about the blog swap that Sweet Potato Claire was hosting I thought it would be so much fun to send a gift to a very deserving Mama somewhere here in Canada and to have a little something come back to me as well.


I couldn't have been more blessed by the package that I received today. As I opened it a wonderful aroma of lemon grass wafted out and inside the little polka dot pouch were three silver tins of healing salves and lotions. A lemongrass body butter, green tea healing hand salve and a lip balm. Each one made with organic oils and essential oils. Oh my how I needed the healing hand salve for my winter hands!
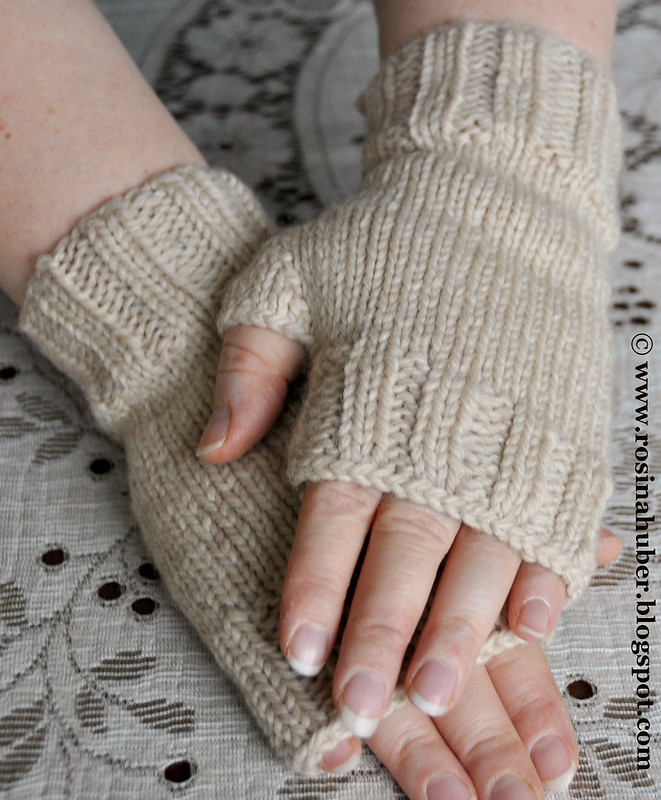
Fingerless Gloves

That wasn't all though. There was one more little package and inside were a wooly and warm pair of fingerless gloves. You know I have knitted similar gloves for my daughter, cousins and even my mom but I have never made any for myself so they are going to be well loved and used :)

Thank you so much Kim!! I am going to use every last drop of cream you gave me. You have truly blessed me with your thoughtful gift.

Being that no one knows who they are going to get their goodies from I think it is safe to share on here what I made for the lucky Mama that I got.
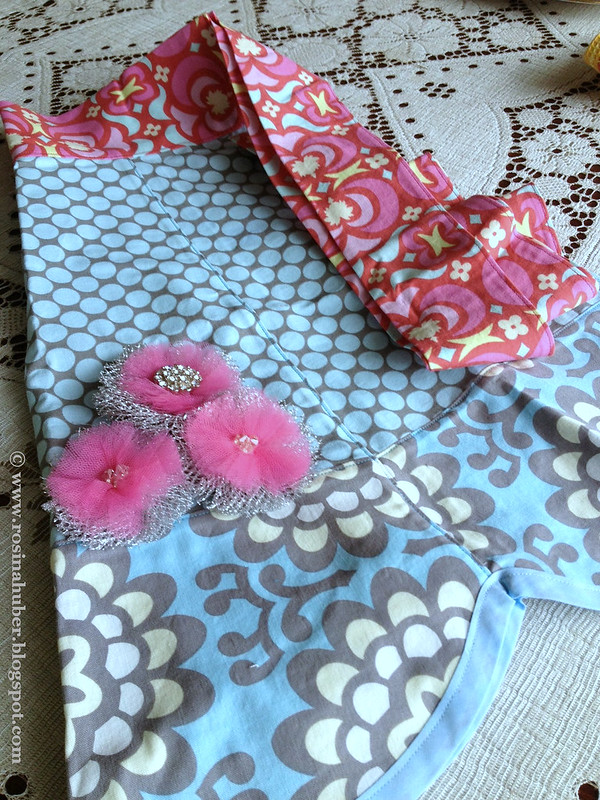
Apron

I have been a busy little girl sewing her a flirty apron...


and one of my favorite burlap market bags with a little coin pouch. I sure hope she likes it :)

Heard of any handmade swaps lately? I would love to know about them.

Hugs,
Rosina

Saturday, December 1, 2012

Waldorf Craft Fair

New Candles

 A few days ago I got an email with a reminder about the Waldorf craft fair that was happening today and a little teaser that there would be activities and singing for the children while we were there :)

Rolling

 When we arrived we found that they had all of the classrooms set up as different little stations. There was one room full of all the wonderful bits and bobs to buy with playsilks, crowns, wands, felt playmats, candles, wooden toys and so much more. Then there was the craft room where the children took turns at the tables sanding and polishing wooden tree rounds for candle stick holders and then rolling sheets of beeswax to make candles for their holders. In other rooms there was singing, puppet shows, snacks and an enchanted cookie house where we went into a dimly lit space with twinkle lights while we were sprinkled with faerie dust and sang to while we picked out our favorite gingerbread cookie to eat :) So much fun!!

Felt Advent Decorations

 There just happened to be oodles of activities going on in the city today while we were there so we had a chance to go to the farmer's market, another craft fair where I got a funky burl candle holder and if we had stayed long enough we would have even been able to see a parade but I wanted to get home before it got to late and even so I ended up driving in the dark *grin*.

So after a late dinner and quick moment to put my feet up I realized that we had to get our advent countdown calendar out. I had nearly forgot that today was the 1st!


Luckily I had saved the maple branch that we had cut and used last year so I retrieved it from its hiding place in the laundry room and brought out some ribbon to tie it up so it is now dangling beneath the mantle. Each day one of the children will be able to find a little felt ornament with the day's number needle felted onto it to be hung up on the branch as we count down the days until the 24th :)

New Candles

Thank goodness no one seemed to mind that Mama was a little behind on the decorations this year *grin*. 

Hugs,
Rosina

Thursday, November 22, 2012

Drawstring Bags, Stamps & Jute

Stamped Muslin Drawstring Bags

 Every year we participate in a wonderful Waldorf themed holiday stocking stuffer swap with families all around the world and this year was no exception! We made 10 sets of hand carved winter stamps full of acorns, snowflakes, gingerbread men and snowmen to send in little handmade muslin drawstring bags stamped with one of the stamps found inside each bag :)

Jute

They turned out even cuter than I had envisioned with their little jute drawstrings *grin*.

Waldorf Swap

 We finally got them all packaged up earlier this week and sent our box of goodies on their way down to the US and in a couple of weeks our box will make its way back to us full of new surprises :) In past years we have received beeswax candles & decorations, aprons with wood burned wooden spoons, playsilks in seasonal colors, gnomes, knitted animals and so many more wonderful things. 

Are you participating in a seasonal swap? I would love to know what you are making :)

Hugs,
Rosina

Wednesday, July 25, 2012

Yarn Along ~ Lepidoptera

A post of my current read and what is cast on my needles ~ Inspired by Ginny over at {Small Things}

Yarn Along ~ Lace Sock

I finally feel like it's that time of year to pick up knitting needles again and found this great lacey sock pattern called Lepidoptera :)

I had bought this soft alpaca yarn earlier this spring thinking it was going to make a great baby sweater for my sister but alas she had a little boy and the pink was definitely not going to do! So into the yarn stash it went until last weekend when I finally found the perfect use for it. A soft pair of socks for my daughter. 

Yarn Along ~ Lace Sock

And she is just itching to get her feet into them! We are constantly having little 'try on' sessions and I haven't even got one sock half finished yet LOL. It's a super easy pattern though. Nothing tougher than making a few extra stitches and it has my all time favorite heel to... short rows. Yay!! If I can avoid doing the regular heel flap type sock heel I will and in this pattern she simplifies the short row process even further by taking out all of those yarn overs that you normally find making it faster than ever and there is a video tutorial to go along with it so you can follow along if you happen to get stuck.

For my book I'm reading Eating Dirt: Deep Forests, Big Timber, and Life with the Tree-Planting Tribe by Charlotte Gill and it is a must read!!  It's the true story of her life as a tree planter here in BC for 20 years and was absolutely fascinating to read about areas right here in my backyard and get a peak at what their lives are really like as we see them so often around this neck of the woods and I must admit I've always wanted to know more about them. Her writing transports you instantly into the thick of the BC rainforest and leaves you wanting more :)

I'm looking forward to seeing what you all have been knitting and reading this week to!

Happy knitting,
Rosina

Tuesday, May 8, 2012

Blue Ribbon Rosette ~ Tutorial

Blue Ribbon Rosette

My daughter has a fun little my first pony book that she was given on her birthday a few years ago and inside was a game to play and little paper award ribbons to give to the first, second and third place winners. Well over the years the paper rosettes have grown rather worn and we've replaced a few ourselves but this time I thought it would be fun to make a really nice one out of felt that would really last and share the tutorial on how we did it with you :)

Glass template

As this was supposed to be her project with just mama supervision I got her to do all of the tracing and cutting so you might see in some of the photos that there is a little bit of black ink showing on the tips of the felt ruffles :)

We started with a glass that was 3 inches in diameter, using it as our template for our ruffled rosette and traced twelve of them to be cut out of our felt.

Blue Ribbon Rosette Tutorial

Once our circles were all cut out we moved onto the next step of folding them into little triangular sandwiches by folding the circle first in half and then in half again just like in the photo above for just 10 of them....

Blue Ribbon Rosette

and then started to space them as evenly as we could around one of the leftover circles.

This part is a little tricky so I helped her out and to make it a little easier on myself for the spacing I took four of the folded circles and placed them onto the base at the north, east, south, and west compass points so that I had a rough idea of how far apart to put the remaining pieces.

As you pin each one down you want it to overhang your backing by about a 1/4 to 1/2 an inch. You definitely don't have to be precise! But you do want to have that extra space so when you sew on your final backing at the end it will hide any embroidery stitching and so on that will be visible on the underside.

Blue Ribbon Rosette

With all of the pieces pinned down she used a bit of regular cotton sewing thread and hand stitched all the way around the base of each of the points to tack them down in place.

DON'T remove  your pins yet! Trust me keeping them in will keep your rosette nice and stable as you continue to work on it :)

Blue Ribbon Rosette Tutorial

So with everything stitched in place we used a smaller glass, this time 2 inches in diameter, to make our rosette center. It really doesn't matter what sizes your glasses are as long as they are both roughly 1 inch different in diameter from each other.

She thought it would be nice to use a darker blue felt for the center and I agree that it really did make the rosette pop! 

I helped again with this part, embroidering the first place onto the felt with white embroidery floss and just using a running stitch to secure it to the front of the rosette.

Blue Ribbon Rosette

You will notice that you still have one of your 3 inch circles from the very beginning left over and this is going to be your backing. You will also need to cut three strips of felt 5 inches long and 3/4 of an inch wide for your ribbon tails.

Position your three ribbon tails how you would like them to look and pin them onto the backside of your rosette with their ends far enough towards the center that they will be fully  hidden when the backing is stitched on.

Blue Ribbon Rosette

To finish we just used regular cotton thread again and my daughter used a simple whip stitch to secure the backing to the underside of her rosette hiding all of our knots and not so pretty stitch work *grin*.  The final touch was to add a brooch pin that I luckily had but you can easily find them at any hobby/craft store or even your local dollar store may have them down the craft isle.

Blue Ribbon Rosette

And that's it!

A super cute blue ribbon rosette for the winner in your household :)

You could personalize these with pretty much any little saying. They would make great birthday boy/girl ribbons, or don't forget about Mother's day that is coming up this weekend. I can see this with #1 MOM on it just for me *grin*.

Have fun making some :)
Hugs,
Rosina

Sunday, April 1, 2012

Easter Bunny Masks

DSC_0099

My daughter totally loves to dress up. Full length princess gowns, ballerina tutus and hand me down halloween costumes from her cousins. She especially loves all sorts of masks but somehow I don't think her hairy beard and moustache disguise or her bandit masks are going to cut it on the Easter scene. I was going to have to come up with something new and preferably of the 'bunny' variety *grin*.

So what I did was take one of her old masks and traced through the eye holes on to the center of a plain piece of paper so I got them spaced pretty much where they needed to be and then just winged it and drew some bunny ears and a simple face shape to go with the eyes. A little trick to getting both sides of your drawing symmetrical when you're finished drawing your pattern is to fold your paper in half so both halves of your drawing are back to back and then pick your favorite side that looks the best and cut out your pattern while folded with the good side up so you end up with both sides exactly the same :)

Ear Stability

After pinning my pattern onto some felt and cutting out two pieces for our bunny mask I had some worries that the ears might flop over my daughter's eyes when she was wearing it because they were so narrow where they met the rest of the mask.

So to remedy that I sewed in pieces of stiff clear plastic onto the ears on the inside back layer of the felt, putting in a few stitches at the very bottom of the plastic. I also made sure that I placed the plastic far enough down close to the eye holes so that it wouldn't still flop because it wasn't far enough past the brow line of the mask. The plastic we used came from some of those 'windows' they put in some boxes. That's why there are still some strips of cardboard leftovers still stuck to them :)

Going Slowly

With the ears reinforced, I sewed on some contrasting white for the centers of the ears, added a little triangle nose and some elastic to keep it on her head and then pinned the front and back pieces together to finish sewing it together which I fully intended to do until L asked to do it herself. Of course I said yes! I love that she wants to join in and do more and more sewing. Her growing confidence in herself and her budding skills are so heartwarming to this crafty mama :)

So slowly and surely she made her way around the mask keeping a close eye on her seam allowance and getting a good lesson on how to maneuver curves *grin*. She did an awesome job and kept it darn straight. Atta girl!

Bunny Mask

With the threads snipped my little girl transformed into a fuzzy little bunny and promptly hopped away LOL.

I wish I knew how to take my paper pattern and turn it into a PDF for you! Maybe someone reading this will be able to share the secret with me *grin*. And in the meantime I hope you'll grab your pencils and whip up your own bunny version :)

Hugs,
Rosina

Thursday, March 29, 2012

Wet Felted Easter Eggs ~ Tutorial

Wet felting easter eggs

Easter is just a hop, skip and a jump around the corner so today we got down to some serious crafty business and made some felted Easter eggs. I know that many of you probably know how to wet felt already but just in case you don't I thought that I would share how we did it :)

I love wet felting with the kids. It's such an easy activity and what kid doesn't totally love playing in the sudsy soap and water! So out came my stash of wool rovings and a couple of plastic easter eggs that I've been hanging onto for these kinds of projects and a couple of hand towels to soak up any puddles of water that might appear *grin*.

wet felted easter eggs mosaic

We started by stretching out some plain, undyed wool batting that would become the inner layer of our eggs. I really like to use the plain wool batting as filler for my felting projects because it is SO much cheaper to purchase than the smaller dyed rovings and you can use a lot of it without worrying about using up your stash of the good stuff.

Winding the wool batting around our plastic egg as tightly as we could we continued to add layer after layer, alternating the directions of the pieces with each new one added until it was about three times larger than it's original size and then we added a final layer over the white using some pretty pinks and blues to give our egg color. Make sure you create a good sized ball of wool because it is amazing how much it shrinks during felting :)

wet felted easter eggs mosaic2

Next it was time to get down to the business of felting all that wool together. With the cold water running we dribbled a little of the water at a time over our ball of wool until it was nice and wet. It's important to treat your wool very gently at this point because the wool shifts really easily. So with a generous amount of dish soap on our hands we gently started to pat and rub our egg.

Working our hands around in circles all over the egg we gently agitated the wool until we could feel it starting to become a little more firmer beneath our fingers and then we started to alternate with cold and hot water to shock the wool fibers even more to help them knit together nicely. If you haven't tried this before you will definitely start to feel a difference. The fibers on the surface won't slip around as much, it will start to shrink up smaller and you will be able to rub at it with more pressure the firmer it becomes.

Do not worry if it seems like your wool looks really giant and sloppy over the plastic egg inside! My kids rolled their own eggs this time and I thought they would never shrink down but if you look at the above photos you will see how giant my daughter's egg was when she started and how small it was in the last photos. I did help her out at the end to really rub and squeeze at it firmly and I can't say enough about shocking it with some really hot water and then plunging it back into really cold water again all while rubbing it firmly. It really does help it to tighten up more quickly :)

wet felted easter eggs mosaic4

When we were finished felting our eggs we wet felted a couple of little yellow chicks using the same method as above minus the plastic egg inside and then I tossed both the eggs and chicks into the dryer to shrink them up one last little bit and dry them.

The kids could hardly wait to pull them out of the dryer to see just how I was going to get the plastic eggs out from inside of them *grin*. With a sharp pair of sewing scissors I cut a jagged opening across half of the wool eggs so that they looked like they were hatching open and popped out the plastic eggs from inside of them leaving a perfect hollow center where we could now tuck our little chickies inside...

Chicky

but not before we needle felted on their eyes and beaks :)

wet felted easter eggs mosaic5

All finished and ready for playing with!

There was peeping and cheeping and chickies popping out all over the house all afternoon *grin*.

Wool Felted Easter Eggs

I hope you have fun making some of your own Easter eggs and chickies :)

Hugs,
Rosina

PS. Looking for more crafty ideas or inspiration? Pop over to Natural Suburbia's Creative Friday and see what others are up to :)


Wednesday, February 8, 2012

Mini Heart Bunting Valentine Cards & One For You

Valentine Heart Bunting Cards

Each year the kids and I have fun making valentine cards to give away to friends and family and in addition to this we decided that it would be fun to participate in a valentine card swap this year as well that will provide us with oodles of mail which is just plain fun anytime.

What I hadn't anticipated was making 38 cards! Yes, that was definitely more than I ever could have imagined but creating things with the kids is always fun :)

Sewing Mini Bunting

I love making bunting and my daughter always wants to use my sewing machine so I thought I'd combine the two together and so our little mini heart bunting cards came to life :)

We started by cutting out little rectangles of burlap fabric slightly smaller than the face of our cards and pulled out a few threads from each of the sides to give it a frayed appearance. Then between the two of us we traced over 120 miniature little hearts onto the paper side of some Heat n Bond paper that we would later iron onto an assortment of red fabrics.

With our hearts traced, ironed onto our fabrics, cut out and then permanently affixed to the top of our burlap rectangles in a semi circle formation it was time to get stitching!

Mini Heart Bunting

Using a nice bright red thread my daughter stitched on the string for our bunting so that it no longer looked like our hearts were just floating all alone finishing the mini heart bunting...

Sewing

And then she took each of the finished burlap rectangles and stitched each of them to the front side of each of our little note cards. So much more simpler than mucking around with glue and then waiting for everything to dry! Plus getting to use mama's sewing machine is always such a treat :)

Valentine Heart Bunting Cards

I just love how they turned out with their little red stitching from the sewing machine and I was so happy that my daughter had so much fun sewing them. Originally I thought that she would maybe make it through half of the cards we had to make but she just wanted to keep sewing and sewing which actually turned out to be a good thing because we now have extras to share with you!

So if you or your children would like a little surprise Valentine card sent to you in the mail just let me now in the comments below and make sure you leave me a way to get in contact with you for your address :)

The first five commenters will have one personally sent to you by my happy heart stitcher *grin*.

All of the Valentine cards have now been spoken for :)

Hugs,
Rosina

Wednesday, December 21, 2011

Holiday Cheer

Christmas lights

Our tree finally made it in the house this afternoon and took its place in the family room filling the air with the smell of fresh pine :)

Stringing Popcorn

With a bowl of freshly popped popcorn the kids and I got busy stringing long strands of popcorn together for garland...

Chocolate decorations

to be hung along with pretty chocolate balls and candy canes.

Angel

It was so pretty this evening as we all sat in the dark with only the glow of the tree to light the room as we celebrated winter solstice and the return of longer days.

Rudolph

I've been promising to share photos of our decorations above our fireplace and the sun came out today and I thought if I don't get some good pictures now we may not get any light again for a while *grin* so here they are :)

I had mentioned a couple of weeks ago that my son was working on making a cardboard 3D silhouette of Rudolph to hang above the fireplace and it turned out fantastic!! I found it originally on pinterest but the link only gave plans for a very small one that you could print on your printer so he drew a larger one freehand and it must be about two and a half feet high filling in the mantle space right to the ceiling.

Fabric Finnish Stars

Another special ornament I made this year was all due to my lovely blog friend Amy who shared about the Finnish Stars she had made out of fabric and I was completely smitten with hers and had to make some of my own. Oh my word do I just love how these turn out and there are quite a few people on my Christmas list getting these this year *grin*.

Heat n bond Glue

I used heat 'n bond between my layers of cotton and linen, I'm not sure if she glued hers together this way, but I found that I could stick quite a few portions of each star together with little squares of the heat 'n bond in one swoop of my iron and the glue layers stiffened it up quite nicely :) They are a bit tedious to make like she had mentioned but after the first couple it seemed to move a long a little quicker but now that I've made eight of them I'm glad to be finished LOL.

Mini Gingerbread houses

Beneath the candy canes and finnish stars, rudolph we placed some of our mini gingerbread houses that we made last year and a few decorative trees and called it complete.

I wanted to keep everything really simple this year so the decorations are really minimal, not to many lights or knic knacs and most of what we used we baked, sewed or made from paper aside from a few sugary items. As I strive to personally keep my focus on the calm joy of the season and on family and faith I find it helps to keep all the surrounding noise of excess items to a minimum so I don't get distracted. So far so good *grin*.

Hugs,
Rosina

Thursday, December 8, 2011

Holiday Fun

Advent Calendar

Our advent calendar is growing!

Each morning one of the children takes a turn hanging a new little decoration onto our tree limb as we get closer to Christmas eve :)

Rudolph

We're still sprucing up our mantle and today my oldest started working on a 3D silhouette of Rudolph the Reindeer that will have antlers, a red nose and will eventually be hung above the fireplace. I knew I had been hanging onto those large pieces of corrugated cardboard for a reason!

Playing in the woodshed

The temperature has fallen below zero and we've had a good perma freeze for the last couple of days so both of the woodstoves have been going 24/7 to keep both ends of our home warm. That means an awful lot of firewood is making its way in and out of the basement and the children have been a HUGE help :) Today all three of them went out to bring more in with big brother filling and rolling the wheelbarrow to the basement window and then the younger ones handing it in to him so that it could be stacked up right away and keep the bark mess off the floor just in case we have a repeat of our flooding again.

I've been watching the newspaper for special Christmas choral preformances that are family friendly and free which is a big perk and this Sunday one of the churches in the city is hosting a Christmas choir and I can't wait. I just love listening to the large choirs sing. So beautiful and only a few more sleeps to go *grin*.

Hugs,
Rosina