Showing posts with label homemade. Show all posts

Wednesday, December 5, 2012

Getting Ready for Saint Nicholas

For Saint Nicholas

There was much anticipation as the children pulled out their wooden shoes for the arrival of Saint Nicholas tonight and filled them with carrots and hay for his horse :)

We have spent the last couple of days reading some of our favorite books like the Legend of Saint Nicholas and The Baker's Dozen and of course we had to pull out our Veggie Tale movie of Saint Nicholas as well. It just wouldn't be complete without the veggies *grin*.

Holly Wreath

I've been sneakily collecting a few special books for their gifts in the morning and this year to make their gifts special I made these little wreaths with holly leaves. I just cut out a cardboard wreath shape and then used my hot glue gun to glue them all around the cardboard circle. Really easy and I think I'm going to make a bunch more for the rest of my christmas gifts :)

Brown Paper Packages

 I just love how they turned out and now I'm off to fill their shoes with nuts and other goodies before they wake up because I know they will be up before the first light of morning. There will be no sleeping late for mama tomorrow :)

Hugs,
Rosina

Saturday, November 24, 2012

Apple Hand Pies

Apple hand pie maker

 Whenever I have pastry made for baking I always have this urge to make little hand pies with it but I never follow through thinking it's going to be way to much work fiddling around with them. Not long ago though when I was grocery shopping I found this cute little mold for making apple shaped hand pies that would be just perfect for using with the apples we had left from picking and I knew my daughter would love it to :)

Apple Hand Pies

 With our chilled pastry and floured rolling pins in hand we started rolling and placing our dough in the press.

Making Hand Pies

 Why do these little things always look like they are going to make the job so simple but it's never quite so?! The instructions said to use the outside of the press like a cookie cutter to get apple shaped pastry pieces that you then laid inside with the filling and  pressed together to make your hand pie. 

Of course this totally didn't work when the pastry started to slide into the indentations on the inside of the press while needing the strength of He-Man to make the crimped edges show up. All this was definitely giving me flashbacks to a pierogi maker I tried using years ago that squeezed all of the filling into a doughy balloon that got stuck in the crack of the press making an awful mess *grin*.

Needless to say we tossed those instructions in the trash can! LOL.

Apple Hand Pies

In the end we just cut our pastry into rectangular shapes and layered them in the press with our sliced apple filling sandwiched in between and it worked out so much better :) L rolled and filled while I pressed them as hard as I could until we ran out of pastry.


Oh my goodness were they delicious!!! We sprinkled a bit of cinnamon sugar on top before baking them and when they came out of the oven and cooled enough so that we could hold them they were nice and firm and the perfect treat for a chilly fall afternoon.... not sure how soon I'm going to attempt making them again though *grin*.

Hugs,
Rosina

Thursday, November 22, 2012

Drawstring Bags, Stamps & Jute

Stamped Muslin Drawstring Bags

 Every year we participate in a wonderful Waldorf themed holiday stocking stuffer swap with families all around the world and this year was no exception! We made 10 sets of hand carved winter stamps full of acorns, snowflakes, gingerbread men and snowmen to send in little handmade muslin drawstring bags stamped with one of the stamps found inside each bag :)

Jute

They turned out even cuter than I had envisioned with their little jute drawstrings *grin*.

Waldorf Swap

 We finally got them all packaged up earlier this week and sent our box of goodies on their way down to the US and in a couple of weeks our box will make its way back to us full of new surprises :) In past years we have received beeswax candles & decorations, aprons with wood burned wooden spoons, playsilks in seasonal colors, gnomes, knitted animals and so many more wonderful things. 

Are you participating in a seasonal swap? I would love to know what you are making :)

Hugs,
Rosina

Sunday, October 7, 2012

Fall Comfort Food ~ Sweet Potato Gnocchi

Sweet Potato Gnocchi

 October 1st was the first time I had to light the woodstoves to take the chill off of the air in our home and we awoke to our first hard frost of the season yesterday! The lawn was crispy and white and all of the water buckets for the cows and chickens had a layer of ice locking in the fresh water below. All of this cold weather has definitely left me yearning for warm comfort foods :)

I've been building up a little recipe cache on Pinterest which is where I found a yummy recipe for sweet potato gnocchi but I didn't have all of the ingredients on hand so I took a chance and remixed the recipe a bit and it turned out delicious!

Sweet Potato Gnocchi

 In place of the ricotta cheese I used one egg, subbed in 1/2 a cup of asiago cheese instead of the parmesan, reduced the salt to 1 tsp. of sea salt in the dough instead of the two she called for and I baked my sweet potatoes in the oven for about 45 minutes at 400 degrees fahrenheit instead of microwaving them.

Now this was my very first time making gnocchi so I had no idea how sticky the dough would be but I found that I needed to use at least 4 cups of flour to get my dough to be workable and not crazy sticky but the original recipe only called for 2 3/4 cups. So I'm thinking my sweet potatoes were much larger than hers but you'll definitely know if you need to add more flour *grin*. 

Sweet Potato Gnocchi

 With my dough all ready to go I got busy rolling out dough snakes, chopping them into little bite sized pieces with my pastry cutter and then rolling them around with the tines of a fork to give them the little indentations in the photo. Nobody told me how many little gnocchi this recipe made though!!

I kept cutting and rolling and cutting and rolling...
until I had two giant cookie sheets full of them plus more all over the counter. On my final count I had over 200 of them so they all went into the freezer except for the ones I kept out for dinner and we're all stocked up for a good while now I think :)

The kids aren't real big on the taste of sage so I omitted the sage butter that went along with the recipe as well and instead made an easy sauce with basil and homemade chicken stock. 
I used:

1 cup homemade chicken stock
1 tbsp dried basil
1 tbsp arrowroot powder
1 tbsp onion powder
salt & pepper to taste

Mix all of the above together in the cold chicken stock and pour over two carrots cut into matchsticks, two cups of broccoli florets and 3 cloves of pressed garlic that have been sauteed until just tender. The arrowroot created a nice thick sauce just perfect for our fresh gnocchi to be coated in. Mmm, mmm good. Now if only there were leftovers *grin*.

Hugs,
Rosina

Saturday, March 17, 2012

Catching Leprechauns

Rainbow Cake

The children and I set out to catch a Leprechaun today with it being St. Patrick's day and all *grin*. And what better way to catch a tricky little leprechaun than to bake a rainbow colored cake and make him think that there was a pot of gold to be had!

I had ran across the fun idea for this cake over at Not Martha and we set to work making a batch of homemade regular yellow cake batter using this recipe as our backbone, modifying it with less sugar and using yogurt whey for the milk, and then splitting it up into seven different bowls so that we could add all the colors of the rainbow.

Cooling

Just under an hour later our rainbow cake was out of the oven and cooling on the window sill so that it would be ready in time for dessert after dinner :)

Leprechaun Trap Cake

No sooner had I put our cake on the table, set the trap with a mountain of gold coins and erected our 'come and get the gold' signage for our leprechaun, we had one climbing the ladder to steal our pot of gold!

Leprechaun Trap

But we were much to crafty for him! He fell straight into our trap...

Rainbow Cake

and we got both the gold and the cake *grin*.

Hope you had a fun St. Patrick's Day to!

Hugs,
Rosina

Sunday, March 11, 2012

Weekending

The Ring Leader

Did you remember to spring ahead this morning? I didn't! *grin*

Our day started with my usual lighting of the woodstoves, making sure everyone got breakfast, puttering around the kitchen tidying up, planning for lunch and today I popped on a pot of bones and veggies for chicken soup. Just before we reached lunch which was now past lunch I realized that I was truly running an hour behind. I had joked on my twitter page that I had been living in the past all morning but the truth of it was that I never caught up with the time today!

So I decided that I was not going to set my clocks ahead today since I simply just could not catch up!! That's right I had my own personal time zone for the entire day and tomorrow we'll catch up to the rest of you LOL. I swear sometimes it's a good thing we live in the sticks where we can march to the beat of our own drum *grin*.

Hand warmer

We've had quite the run of weather to with sun, rain and snow flurries and sometimes they were happening all at the same time. The temperature in the shade today was just above freezing so the kids had to do a lot of running and jumping to keep warm but when they realized that just wasn't working for them they came up with a new plan to help keep themselves warm....

Chicken warmers!

I bet you didn't know that chickens make great hand warmers *grin*. The kids would run into the pen, pick up the closest chicken, tucking their hands around their warm fluffy bodies and warmed up a bit. Plus the chickens just loved the extra attention :)

Would you like some soup?

In payment for providing warmth for their little hands my youngest two collected pine cones from the mugo pines in our front yard and blades of grass to create a soupy treat for the chickens. You've got to love their imaginations! The chickens weren't to keen on their treat but did pluck out the odd blade of grass for a nibble :)

Hauling

Before my husband left for work on thursday he had been a busy boy demolishing my old clothesline stand. It had been getting pretty rickety and rotten and he knew that I really wanted a new one so he finally tore it down. I can't wait for my replacement stand. The warmer days are just around the corner and I can't wait to get the laundry out to air dry again. For now though the scrap lumber has been stuffed in the back of our horse trailer so we can haul it down the the bottom of our property for a big bonfire when he returns :)

Making Yogurt

I've been making a lot of homemade yogurt to. It is sooo good! I just have to remember to make sure I put it on in the evening so it's ready for our granola in the morning :)

How was your weekend?

Hugs,
Rosina

Wednesday, February 1, 2012

Sunshine & Sausage Making

Johnstone Strait

Now that is an odd title I do admit but since my photos include a little bit of both I thought it fit *grin*.

The sun graced us today with its warmth and light and it felt so good after the last bout of rain we were soaked with. After lunch we bundled up and set out for a walk to burn off some extra energy from being house bound and searched for interesting finds along the way. We admired the snow still clinging to the highest mountain peaks, spied on little Sparrows and Spotted Towhees and at one point my 5 year old even ripped his boots off so that he could walk barefoot over a bunch of clumped moss along the roadside LOL. Now that would have made a good photo. Oh how I wish I had brought my camera with me!!

Homemade sausage

We have finally finished putting our cow into the freezer which is such a relief. It was two very long days of cutting and wrapping from morning till night and tired aching feet and backs but the sight of our freezer bursting to the top with those brown paper packages makes it all worth it.

Our favorite part of the whole process though is making sausage :)
I use a mix of 3/4 beef to 1/4 pork, fresh garlic and onions run through the grinder along with the meat and a bunch of spices mixed in to make our sausage meat. I don't add any extra fat or fillers, just the basics and then once its all mixed together Hubby feeds it into our grinder which has a handy little sausage stuffing attachment and I control the sausage casings, filling them uniformly for twisting into links later.

The whole process moves along quite quickly and if you ever need to buy a very economical meat grinder with a lot of punch I highly recommend Moulinex. We have a Moulinex HV6 and it has two plates for course and fine grinding, sausage horn and a reverse function in the even that it jams and we have been using it for the last 9 years. It has ground all our beef that has been butchered since purchasing it and we finally had to sharpen the blade this time around as it was a bit dull. I'm not sure if you can still get the HV6 but I see there is a newer model now available :)

Making Links

So here they are all twisted into links and portioned into dinner sized amounts. They are drier than a normal store bought sausage understandably since we don't add any additional fat but they make up for it in taste and I know exactly what is in them :)

Hugs,
Rosina

Sunday, March 27, 2011

Making Sushi ~ So Fun!!

Making Sushi

Our study on Japan for K's research paper is finally finished and the culmination of the entire project was to meet up with the three other families from our homeschool book club and to not only share our reports but to also bring along a special dish from the country we studied.

Rolling Sushi

So sushi it was for us :) I made a special trip into the city to find Nori which is the seaweed wrapper, sticky rice and some different vegetables and fish for the filling.

Sushi

We both took turns rolling the nori with sticky rice and a mixture of smoked fish or crab and avocado and cucumber. It took a little bit to get the hang of rolling them in the mat and less is definitely more when it comes to the filling part *grin*.

California Rolls

We made some similar to the California rolls with the crab, cucumber and avocado and then sprinkled black sesame seeds on the outside...

California Rolls

a smoked salmon, cream cheese and cucumber roll with thin slices of avacado on the outside called caterpillar rolls...

Shikai-maki

and then we thought we'd get really fancy or at least try to look like we really knew what we were doing *grin* and made Shikai-maki which are a decorative four sided version of regular sushi rolls. You can see they are the square shaped ones below and we filled them with kiwi and pineapple and had a special fruit and honey dipping sauce I made for them :)

Sushi

They turned out great and were a huge hit! I never imagined that everyone would love sushi that much. There wasn't one left when we were finished *grin*. Personally I don't really care for the taste of the seaweed but the kids liked them so I will probably make them again :)

Sushi

They had so much fun trying to eat them with the chopsticks I brought to :) It was a great potluck! There were samosas with chutney, special fried rice, a fluffy fava bean dip with naan bread and a ravioli pasta for everyone to try.

The whole thing really got K excited about studying other countries and it was his first big report he has actually had to write so it was great intro into thesis statements, APA style format for laying it out, bibliographies and more. All of the artsy fartsy stuff like making his kimono and geta, the salt dough map he made and the sushi making broke it up into nice little chunks of hard work with the writing and and then nice easy breaks of creativity which really kept him wanting to keep at it :)

Hugs, Rosina

Friday, December 17, 2010

Gingerbread Love

Miniature Gingerbread houses

Remember those adorable mini gingerbread houses I linked to a while back? Well I finally got a chance to make them and they are even cuter than I imagined!!

Mini Gingerbread houses

I must have spent a good portion of my morning hand cutting all of the doors, walls and roofs but it was surprisingly enjoyable *grin*. And the house smelled amazing with the scent of ginger, cinnamon and cloves. Those have to be some of the most festive holiday scents along with fresh cut cedar boughs :)

Miniature Gingerbread Houses

Even though some of my pieces were not exactly square the completed houses went together perfectly with the aid of the royal icing. Gotta love that stuff! It's so thick that you can mold it like putty and with the heat of the woodstove blazing beside us they dried within minutes :)

Miniature Gingerbread Houses

It was to late tonight for us to perch them on a hot mug of cocoa and nibble on their candy roofs as it was nearly bedtime but we sure are going to enjoy munching on a few of these this weekend :)

Did you get a chance to make some to? I'd love to have a peek at how you decorated yours :)

Hugs,
Rosina

Monday, December 6, 2010

Roasted Potato & Leek Soup ~ Recipe

Potato and Leek Soup

Remember those leeks that I mentioned having left in the garden? Well I did finally pull them up but not until after they had been hit by a hard frost *grin*. I had planned to make soup with them so I wasn't to worried if they froze but you know what, when I pulled them out of the frozen soil they came out perfectly clean! Now if only I could pull them out of the ground like that all the time :)

I was really excited to try making a creamed leek and potato soup using some of the potatoes and rosemary that came out of our garden as well.

I started by cleaning 12 of my leeks by trimming off the hard green tops and the roots leaving the nice white fleshy bottoms and then splitting them in half. My leeks were only 1/2 - 1 inch in diameter so if you are buying leeks you could use 4 really nice large leeks :) I then added 8 peeled and cubed medium sized potatoes, 1 large sweet onion such as a walla walla quartered, 1 large red pepper cut into large chunks and 2 sprigs of rosemary.

Place all of your vegetables into your roasting pan, toss with a generous splash of olive oil, some salt and pepper and roast at 400 degrees Fahrenheit for about 30 miutes or until all of your vegetables are fork tender. Mmm, the smell of them roasting is delightful *grin*.

Potato and Leek Soup

Once your vegetables are cooked and slightly cooled it's time to pureé them in your blender :) Place a couple large scoops of vegetables in your blender with a good splash of milk and blend until smooth.

I decided to make my soup milk based but you could use chicken or vegetable stock in place of the milk if you like! I also found that the potatoes made the mixture quite thick while they were in the blender so if you have one of those stick blenders that might make quicker work of the blending so that you don't have to do multiple batches in the blender :)

Once you have pureed all of your veggies you can adjust the thickness of your soup by adding more milk or stock and season with additional salt and pepper to your liking :)

Potato and Leek Soup

This is a delighfully filling soup and the roasted vegetables give it a yummy flavor. Plus with it being so smooth and creamy your children will have NO idea what is in it *grin*. The perfect solution to the picky eater LOL.

I paired it with homemade cheese buns and everyone loved it :) I hope you enjoy making some for your family.

Hugs,
Rosina


PS. Looking for more great recipes? Check out the Hearth & Soul Blog Hop

Sunday, September 19, 2010

Undie Update

Undies

Well I still haven't got any of the cotton/lycra fabric that I need to finish the leg and waist bands of my undies (hopefully tomorrow) but that's definitely not stopping me from sewing more :)

Who wouldn't want to make more! Have you seen how stinking cute these little boy ones are?! They are adorable with their little boy fly flaps in the front *grin*.

Undies

My 4 year old is completely crazy about the little owls on them and I've got him and his sister so excited about them that they are begging to try them on :) I am seriously thinking about making these for Christmas presents for everyone I know LOL.

I just need to figure out how to make them in my size now!

~ Rosina

Friday, September 17, 2010

Homemade Chicken Noodle Soup ~ Recipe

Chicken Noodle Soup

I really do love fall :)
The blustery wind, chilly temperatures, burning fireplaces, beautiful reds and golds that adorn the trees, crunchy maple leaves underfoot and SOUP!

I have been waiting to make soup for quite a while now, slowly stocking up on bones and roast broth in the freezer for those cold dark winter nights and it's finally time! The first of September the temperature took quite a dip and marked the official start of soup season *grin*. So I whipped up a big batch of chicken noodle soup using the left over chicken from dinner the night before and I thought I'd share my recipe with you just in case you've never tried making your own homemade chicken stock :)

Chicken Noodle Soup

One roasting chicken never really does much more than one big yummy chicken dinner with all the fixings for our family of 5 and then usually chicken sandwiches the next day so soup is a great way to extend it by two more meals :)

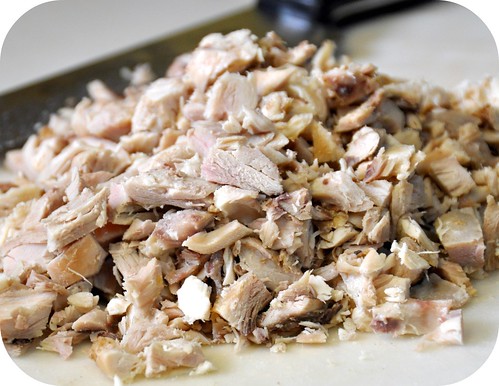
Start by picking off all of the meat left on your chicken. It's best to do this right after dinner the first night when the chicken is still warm and none of the fat drippings have congealed on it from sitting in the fridge. It's amazing how much you can get off that little bird if you really work it over LOL. Now you can toss all of those bones and bits left from the picking back into your roasting pot if it is one you can put directly on your stove top or into a storage container for the next day when you are ready to make your chicken broth and put all of the good meat in another container for finishing off your soup at the end :)

Chicken Noodle Soup

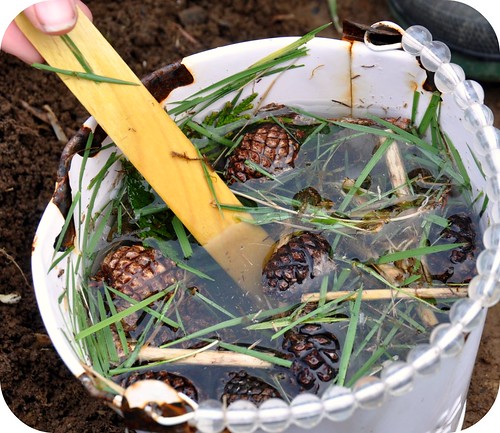
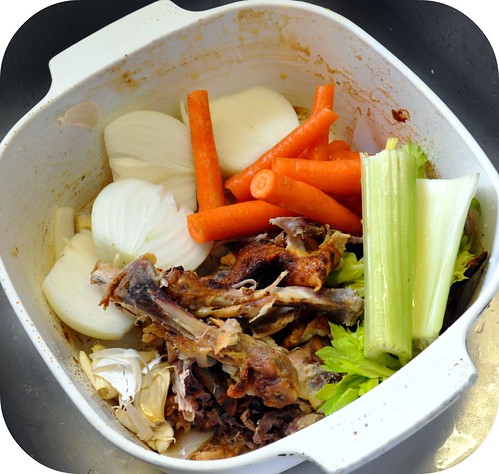
When you're ready to start making your broth fill a large soup pot with:

  • your chicken bones
  • 4-5 carrots
  • 2 large onions
  • 3-4 ribs of celery
  • 1 whole head of garlic cut horizontally in half
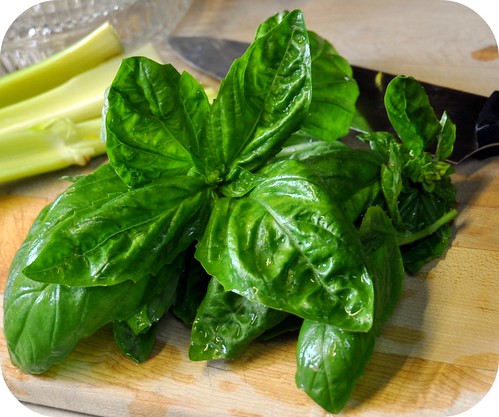
  • and a big bunch of fresh basil leaves if you have it :)

I usually trim the tops off the carrots and peel them, take the skin off my onions, wash the celery and then just break all of them into large chunks for the pot. For your garlic there is no need to peel the cloves of garlic because you are going to strain all of this out of your broth so you can just cut the head of garlic in half horizontally and toss it in the pot *grin*.

Once all of your vegetables are in the soup pot along with your bones, fill it nearly to the top with fresh water, place it on your stove top and simmer gently for about 3-4 hours to really meld all of those great flavors together.

Chicken Noodle Soup

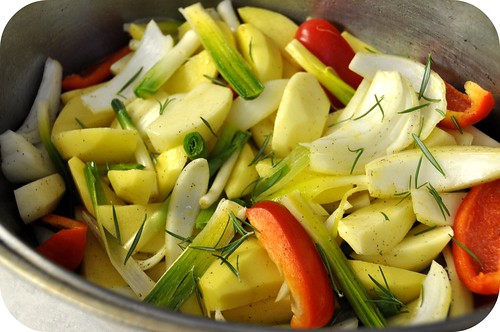
About an hour before you plan to strain your chicken broth you can start getting all of the noodles and vegetables for your finished soup ready.

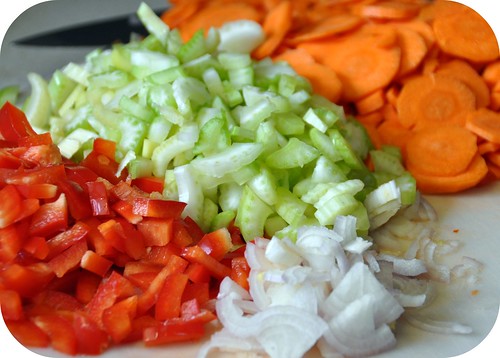
I always like to use 5 or 6 large carrots cut into rings, 4 ribs of celery cut into chunks, 2 scallions diced, and this time I threw in an entire red pepper that I diced :) Now these vegetables are only a suggestion! If you want to add potato or parsnip do that, or if you want to leave out the red pepper then do that to! You can have any vegetable combination that you like :)

If you want to have noodles in your soup you can also pre cook your macaroni, shell, or fettucine noodles now to. Use about one cup of dried noodles, boil according to your package directions and then strain and set aside for finishing your soup.

***The reason that I like to pre cook all of my vegetables and noodles is so that when my chicken broth is finished cooking I can toss all of the veggies, noodles, chicken and seasonings into the pot and it is all ready to eat! No more waiting for vegetables to cook in the soup broth thus extending the cooking time any further *grin*.

Chicken Noodle Soup

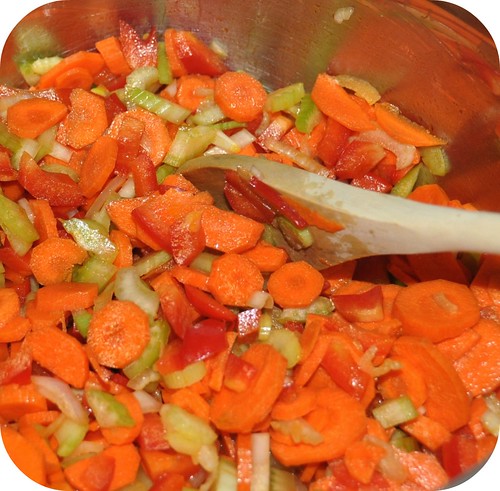
As soon as you have all of your veggies chopped up, heat a stainless steel frying pan with a drizzle of olive oil in it to keep anything from sticking and toss in your vegetables so that you can stir fry them until just tender. As soon as they are to the tenderness that you like remove them from the stove and set aside.

Chicken Noodle Soup

You are now ready to finish off your soup. Yay :)

In your kitchen sink place a pot or bowl that is large enough to accommodate all of your boiling hot chicken broth that you have simmering on the stove. You are going to place a strainer inside that bowl and very carefully pour your pot of hot broth into the strainer so that all of that clear yummy broth is caught in the empty bowl and the bones and boiled vegetables are in the strainer that you can lift out of the bowl and toss.

Put your clear chicken broth back into your pot on the stove top again and add your pre cooked vegetables and noodles, your chopped chicken that you saved from picking it the night before and season it to taste with salt & pepper and more basil if you like and cook for a few minutes more just to reheat all of your veggies and meat :)

Chicken Noodle Soup

Mmmm, so delicious and sooo good for you :)

Serve up a hearty bowl of that wonderful homemade chicken soup that you worked so hard at making *grin* along with some fresh buns and your family will seriously love you forever... I know they just LOVE you to bits already! LOL.

PS. Check out the Wholesome Whole Foods and Food Renegade weekly link up for more great recipes and articles :)

Hugs,
Rosina