Showing posts with label round. Show all posts

Tuesday, May 8, 2012

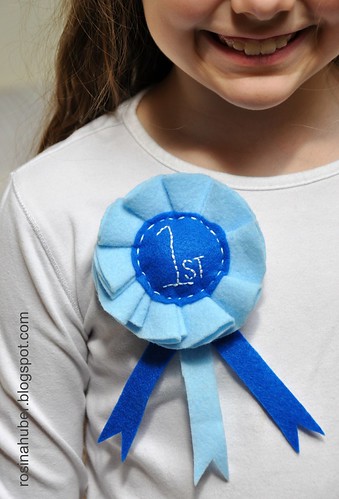
Blue Ribbon Rosette ~ Tutorial

Blue Ribbon Rosette

My daughter has a fun little my first pony book that she was given on her birthday a few years ago and inside was a game to play and little paper award ribbons to give to the first, second and third place winners. Well over the years the paper rosettes have grown rather worn and we've replaced a few ourselves but this time I thought it would be fun to make a really nice one out of felt that would really last and share the tutorial on how we did it with you :)

Glass template

As this was supposed to be her project with just mama supervision I got her to do all of the tracing and cutting so you might see in some of the photos that there is a little bit of black ink showing on the tips of the felt ruffles :)

We started with a glass that was 3 inches in diameter, using it as our template for our ruffled rosette and traced twelve of them to be cut out of our felt.
Blue Ribbon Rosette Tutorial

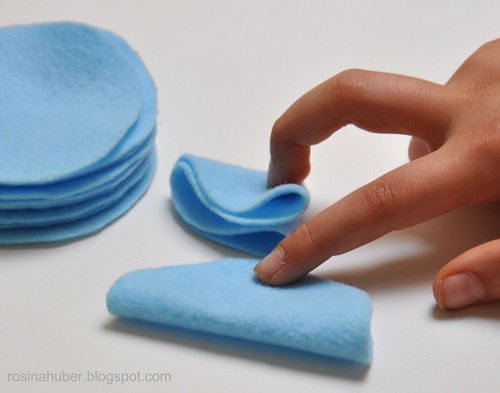
Once our circles were all cut out we moved onto the next step of folding them into little triangular sandwiches by folding the circle first in half and then in half again just like in the photo above for just 10 of them....
Blue Ribbon Rosette

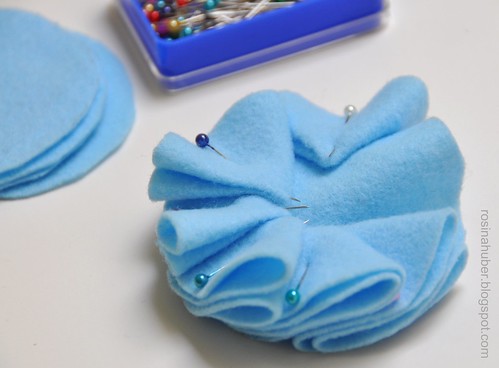
and then started to space them as evenly as we could around one of the leftover circles.

This part is a little tricky so I helped her out and to make it a little easier on myself for the spacing I took four of the folded circles and placed them onto the base at the north, east, south, and west compass points so that I had a rough idea of how far apart to put the remaining pieces.

As you pin each one down you want it to overhang your backing by about a 1/4 to 1/2 an inch. You definitely don't have to be precise! But you do want to have that extra space so when you sew on your final backing at the end it will hide any embroidery stitching and so on that will be visible on the underside.
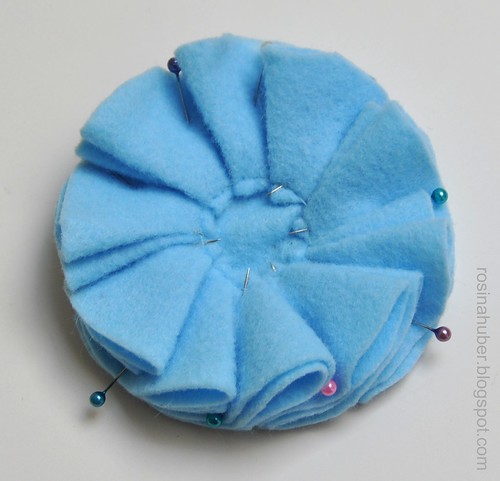
Blue Ribbon Rosette

With all of the pieces pinned down she used a bit of regular cotton sewing thread and hand stitched all the way around the base of each of the points to tack them down in place.

DON'T remove  your pins yet! Trust me keeping them in will keep your rosette nice and stable as you continue to work on it :)
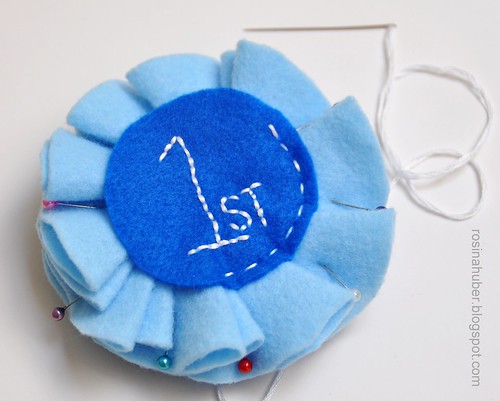
Blue Ribbon Rosette Tutorial

So with everything stitched in place we used a smaller glass, this time 2 inches in diameter, to make our rosette center. It really doesn't matter what sizes your glasses are as long as they are both roughly 1 inch different in diameter from each other.

She thought it would be nice to use a darker blue felt for the center and I agree that it really did make the rosette pop! 

I helped again with this part, embroidering the first place onto the felt with white embroidery floss and just using a running stitch to secure it to the front of the rosette.
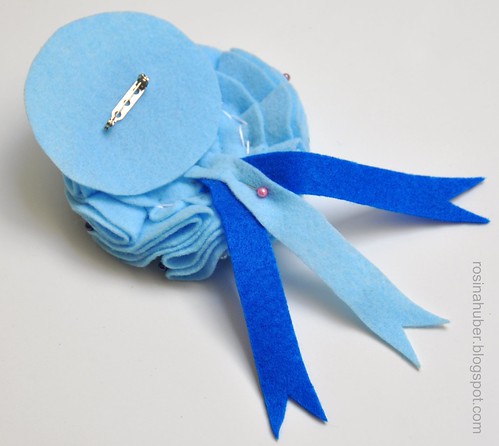
Blue Ribbon Rosette

You will notice that you still have one of your 3 inch circles from the very beginning left over and this is going to be your backing. You will also need to cut three strips of felt 5 inches long and 3/4 of an inch wide for your ribbon tails.

Position your three ribbon tails how you would like them to look and pin them onto the backside of your rosette with their ends far enough towards the center that they will be fully  hidden when the backing is stitched on.
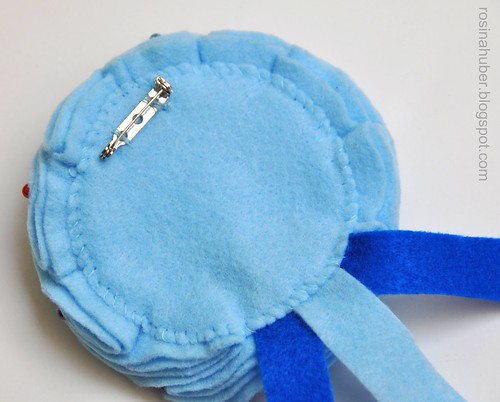
Blue Ribbon Rosette

To finish we just used regular cotton thread again and my daughter used a simple whip stitch to secure the backing to the underside of her rosette hiding all of our knots and not so pretty stitch work *grin*.  The final touch was to add a brooch pin that I luckily had but you can easily find them at any hobby/craft store or even your local dollar store may have them down the craft isle.
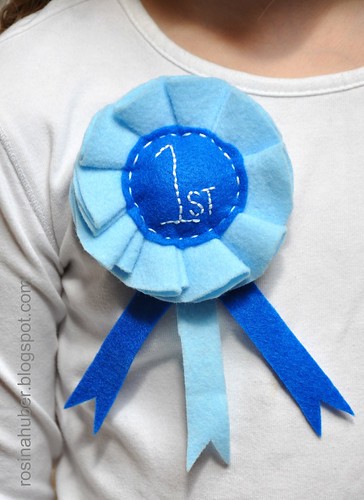
Blue Ribbon Rosette

And that's it!

A super cute blue ribbon rosette for the winner in your household :)

You could personalize these with pretty much any little saying. They would make great birthday boy/girl ribbons, or don't forget about Mother's day that is coming up this weekend. I can see this with #1 MOM on it just for me *grin*.

Have fun making some :)
Hugs,
Rosina

Monday, March 28, 2011

Firewood

Stihl

Firewood seems to consume a great many months of our lives. In the fall it starts with the loading of wheelbarrows and the lighting of stoves which continues through the many winter months and spring brings the cutting and chopping of more wood to replenish the woodshed.

Cutting

K has been out alongside my dad helping this year.
Rounds

Together they have been cutting down some of the leaning alders and cutting them into the exact lengths needed to fit our woodstoves.

Balancing Act
My younger two have been out checking out what they've been up to as well. They love to use the rounds as balance beams, seeing who can last the longest as they walk along them rolling from side to side :)

Splitting Firewood
One big perk to having a growing boy is that he can help with some of the manly chores. With his dad away for work so much of the time this is definitely appreciated by this mama...

Splitting Firewood

Plus there are some monetary rewards that make the work just a little bit sweeter *grin*.

Hugs,
Rosina

Thursday, March 10, 2011

Haylage

Haylage

We decided this winter that we would keep our cow one more summer to fatten him up a little bit more before butchering so that put us in a bit of a pinch to find hay close to home and that didn't cost an arm and a leg as we had nearly exhausted the stockpile that we had.

I made some phone calls up and down the island to find that most of the cheaper bales of hay had been sold or were just to far to justify taking the truck and trailer so I thought I'd try my luck and call a nearby farmer that I know just by name on the off chance that he might have a few spare bales. Success!! He had a handful of the giant haylage bales that he could sell to me and at a really great price :)

Loading

I wasted no time rounding up the kids and getting them all plus Hubby into the truck. The kids had so much fun watching the tractor spear the ball and then watching it dangle and swing lower into the back of our truck box and then sink down nice and low :)

There are approximately 10 bales of hay in each roll of haylage plus some and a good sized bale weighs around 80 pounds so I'm estimating that one of these rounds weighs somewhere in the neighborhood of 800-900 pounds, maybe more.

Haylage

So with that in mind getting one of these guys out of the truck is interesting *grin*.

My dad is a rebel at heart so he likes to tie one end of a rope around the haylage and the other end around the tree, then gun the truck and rip off as the rope snaps tight and the ball stays behind LOL.

Haylage

My husband on the other hand took a more gentler approach and thought that rolling it out with foot power would do the trick :)

Haylage

Going, going....

Haylage

Gone :)

Who knew these babies actually bounce? But they do! Try it sometime it's quite amusing *grin*.

Hugs,
Rosina

Tuesday, February 22, 2011

Yarn Along

A post of my current read and what is cast on my needles ~ Inspired by Ginny over at {Small Things}

Mouse Eating Snake

Oh my goodness, I love this guy!!
I promised I'd share more about my little mouse gobbling snake I made for my little guy and here he is :) I was searching for the perfect gift for the perfect little boy project when I found the Sleepy Snake and Mischievous Mouse pattern. I was smitten with it immediately *grin*. The photo was enough to make me want one and I new he was going to love it to :)

Snake innards

This pattern is super easy!
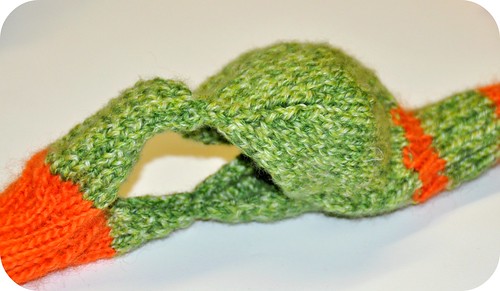
Everything except for the head is knit in the round on DPN's and is just a simple knit 2, purl 2, ribbed pattern and once you get to the head it switches to straight needles. You do have to drop a few stitches on a spare needle while you work the top of the jaw but you pick them back up again to work the bottom and then they carry right on through to the inside of the snakes head and body.

Through some very creative adding of extra stitches you make a smaller version of the head and another ribbed length of the body that slips right inside the main snakes body. This creates the stomach and a hollow space in the head that allows you to stuff it with a bit of cotton batting for a super cute fluffy head! You've got to love his toupée to *grin*. The hair piece is an additional little knit piece that you make and then I just whip stitched it onto the snakes head, adding his sleepy eyes while I was at it :)

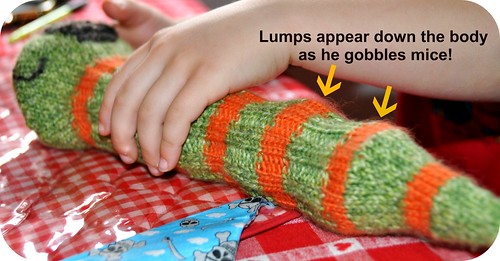
Mice Lumps

Once he's finished you can feed your snakey mice and his body lumps up all the way down the length just like in the above photo just like it would in real life when a snake eats. There is a pattern included to knit up mice but I decided to wet felt some little colorful mice and they were perfect :)

So much fun is being had eating and spitting out mice *grin*. This is going to keep him entertained for a good long while!

Oh and I'm still reading the The Happiness Project by Gretchen Rubin *grin*. Not getting very far on the book reading this week :)

Hugs,
Rosina

Monday, January 24, 2011

Whole Wheat Pumpkin Flax Bread ~ Recipe

Pumpkin Flax Bread

The cold and darker days of winter make me want to bake and cook up a storm! I love to create yummy homemade food for my family but it's also a great way to help keep the main floor of our house nice and toasty with the extra heat coming from the oven :) So when I ran across a new recipe for a pumpkin flax loaf of bread I just had to give it a try using some of the pumpkin I canned in the fall.

The recipe does take a bit of preparation as it requires a sponge but trust me it only takes a minute or two to prepare it!

In a glass bowl mix:

1 1/4 cup whole wheat flour from freshly ground hard wheat berries
3/4 cup of lukewarm water
1/4 tsp yeast

Mix it all together well, cover and let sit on your counter top over night at least 12 hours. In the morning you will find that it has grown and bubbled in the bowl.
***If you are using home canned pumpkin like I am you will also want to place it in a strainer and into the fridge over a bowl so that any excess liquid can drip out of it overnight before using it in your bread in the morning :)

Canned Pumpkin Spears

Now that your sponge has sat overnight and is nice and bubbly it's time to start making your bread!

You will now need:

2 1/2 - 3 cups whole wheat flour from freshly ground hard wheat berries
3/4 cup all purpose white flour (provides gluten for a good rise)
1 cup mashed pumpkin
1 tsp. yeast
1/4 cup water
1/4 cup ground flax seeds
2 Tbsp. flax seeds

Mix your pumpkin, water, ground flax, whole flax seeds and yeast into your sponge and stir until it is nice and smooth. Stir in your white flour and half of your whole wheat and again mix until smooth. Continue to add the remainder of your whole wheat flour a little at a time until you have incorporated all of it. It makes quite a sticky dough and I found that I needed to use the entire amount of flour.

A little tip for working with a dough that is a little bit on the sticky side like this one is to rub a little bit of oil onto your counter top where you will be kneading your bread and onto your hands so that you can knead it for the 8 minutes without having to add any extra flour which can make your finished bread dry.

Once you have finished kneading your dough, cover it with a cloth and allow it to rise until doubled. Roughly an hour.

Pumpkin Flax Bread


Now that your dough has completed its first rise, punch it down to release the gas inside the dough and divide it into two equal pieces. Shape your dough into two nice balls and place on a baking stone or parchment covered baking sheet sprinkled with cornmeal. Cover your dough again with a cloth and let them rise until doubled again.

Once your loaves have finished their final rise you can create a pretty top to your bread with flax seeds by beating an egg white until it is frothy and brushing it gently all over the top of your loaves. Your flax seeds will now stick to your dough. You can also use a sharp knife and gently slice an X onto the top of each loaf which will create a nice look as it bakes as well :)

Bake in a preheated oven at 375 degrees Fahrenheit for approximately 30 minutes or until they sound hollow when tapped on their bottom side.

Pumpkin Flax Bread

Oh my goodness is this bread delicious!!!
It is so nice and soft and if you are worried about it having a pumpkiny taste it doesn't at all. It was a huge hit with the kids so I know this is going to become a family favorite. Now I only wish that I had more of my canned pumpkin as this is really going to eat through my stash *grin*. Guess we're going to have to make sure we grow a whole bunch this year!

This recipe was adapted from this Harvest Squash Bread recipe using regular whole wheat flour and roasted acorn squash so you can definitely make this recipe even if you don't grind your own flour! Also if you don't have an acorn squash substitute in what you do have on hand. Sometimes the best breads come from those you change *grin*

Happy Baking!
Rosina

PS. Looking for more yummy recipes?? Check out this week's Hearth and Soul blog hop :)

Monday, January 3, 2011

Little Helper

Little Helper

When wood heat is your only source of warmth in your home one can never seem to have enough firewood *grin*.

The steep road that my dad has cut up through the mountain behind our home is not suitable for driving on during the summer months because the ground is just to soft but in the dead of winter when the ground has finally frozen rock solid you can drive all the way to the top. A ride up or down is not for the faint of heart though. On the way up the nose of the truck just points towards the sky and with the road being so narrow it feels like the slightest wrong move may send you plummeting over the edge *grin*. I swear the man is fearless!

Dirty Hand

My youngest guy was so happy to help with firewood today :)

Even though there were smaller sticks that he could easily move in the back of the truck he was drawn to the oversized rounds that required a lot of 'man' power *grin*. He tries so hard up with big brother and Opa!

The temperature has warmed up slightly today and the clouds started to roll in. It's always nice to have that little bit of cloudy insulation during the night time. It makes my job of keeping the house warm easier :) There's talk of snow for tomorrow to so I'm hoping that we wake up to a fresh blanket of snow in the morning!

Hugs,
Rosina

Tuesday, November 16, 2010

Yarn Along

A post of my current read and what is cast on my needles ~ Inspired by Ginny over at {Small Things}

Bright Beret

I finished my little pixie hat that I was making last week and thought that I would challenge myself and try a new pattern using circular needles :)

I've had a copy of the cutest little book called Baby Beanies by Amanda Keeys but all of the hats are knit on the round or with 4 needles so I was a little intimidated but I thought that I'd give it a go and try this little beret. I just love the little lace pattern it has :) I'm using a soft merino wool and so far the pink ribbed portion has worked out well but I'm having a bit of trouble joining my green. The first time I didn't join it properly and it didn't knit in the round and the second time when I wrapped the two colors together like it said to in the book it messed up the dashes of green wool showing through the pink for the first purl row so I'm going to have to check out youtube for a little tutorial and see what I'm doing wrong!


What I'm reading this week... the November copy of the British Country Living magazine. Love, love, love this magazine!!! This issue was very fitting for my yarn along post as it a great article on Britain's wool production over the years and another article of thoughts on growing up constantly surrounded by sheep, a wool directory and even an article on one woman's small business of turning fleece to yarn :)

Can't wait to see what everyone else has been up to this week!
Hugs,
Rosina

Monday, October 25, 2010

Loving My Wool Dryer Ball

wool dryer ball

Last week I bought my very first wool dryer ball and I'm LOVING it :) I stopped purchasing dryer sheets a while ago but I'm not to fond of static cling and frizzy hair *grin* so I knew I was going to have to replace them with something! I had heard about a nearby shop that was selling them so I thought that I would check them out and see what all the buzz is about.

There were two choices to pick from. There were ones that were made of tightly wound wool yarn that had been washed to felt it and there were the fancier ones like mine above that had a wound yarn inner core and then had a solid needle felted cover with different motifs on them. Longevity wise the needle felted one like the one I purchased is thought to last longer over the years and I do a ton of laundry so I opted for it, plus I'm a sucker for owls *grin*.

wool dryer ball

They work by bouncing around in your dryer and helping to move your clothing more and incorporate the warm air throughout the wet clothing thus cutting your drying time considerably. It is suggested that you use anywhere from 3 - 6 dryer balls in your load to increase their efficiency. With all of that bouncing around in there it also helps to soften your clothing taking out wrinkles and any stiffness thus taking the place of your dryer sheet!

So far I only have 1 and I'm going to pick up another 2 or 3 of them in the next couple of weeks but so far I've noticed that the static electricity is not as bad. So with more of them I should be static free and using less electricity. That's a big plus in my books *grin*. Most of them come unscented and you can drop a few drops of your favorite essential oils onto them and they will infuse your laundry with lovely floral scents without all of the harsh chemicals. I've scented mine with lavender essential oil right now and when the scent disappears I can either put more lavender or switch it up :)


Mosaic ~ Wool dryer balls

1. ElasIdea 2. BuddhaBunz 3. BuddhaBunz
4. FiberOptions 5. LittleFriendsbySarah
6. DomesticallyGreen


You've got to love Etsy! Here are some of my favorites that I came across while searching for the dryer balls. They come in a varying range of sizes, prices and materials that they are made with and I thought this would give you a start on finding some that you love to :)

Hugs,
Rosina