Thursday, December 30, 2010

The Snow Queen

Snow Queen

Earlier this month we participated in a seasonal handmade exchange and I wanted to share with you the beautiful 'Snow Queen' that we received :)

Snow Queen

She is so pretty with her wool felt dress, leafy wings and seashell cap. She's the perfect addition to our little nature table and the kids just love how she sparkles as her wings glow beneath our nut tree :)

Orange Wool

Inside the little package was also another shell and this pretty orange wool. Oh my how I love orange and yellows so this is just perfect. Thank you so much Sarah we just love everything so much :)

Now I just need to think of something really special to make with our new wool. Any suggestions?

Hugs,
Rosina

Wednesday, December 29, 2010

right now, I AM

Snow Plow

....longing for the snow to return.
How is it that only 15 minutes north of us this is the beautiful winter scenery that awaits me yet here at my home we are completely green again?!

Looking back

I want to go back... or at least for it to return to me :)

Hugs,
Rosina


right now I AM
Click the frog to learn more!

Tuesday, December 28, 2010

Yarn Along

My first sock

I know that Ginny isn't hosting a yarn along this week but I just couldn't wait to share with you how my first sock is coming along :)

I did it! I can hardly believe that it is actually taking shape but I'm really knitting a sock *grin*.

Sock Heel

I was a little worried when the instructions got to the part about forming the heel but I just followed them step by step, slipping stitches and knitting and purling and it started to take shape. It's absolutely amazing what just a few knitting stitches can create!

Now if only I could stop but I have a feeling that I may be knitting into the early morning hours tonight just to see how my little sock is going to turn out *grin*.

Hugs,
Rosina


Looking for more crafty ideas or inspiration? Pop over to Natural Suburbia's Creative Friday and see what others are up to :)


Monday, December 27, 2010

New Bed For The Boy

Assembling

We had a bit of a belated Christmas present for my oldest son this morning :) We were finally able to pick up the new mattress we had ordered quite a while back and put together the long awaited new bed that Hubby had made for him :)

Hubby has been working away on building it for him in the garage during his spare moments when he was home from work using spruce planks, routering, sanding and monogramming it into a special bed just for K :)

new bed

I am so excited for him to finally have a really nice bed!

Previously he had the bottom half of a bunk bed that we had been given when he was just little and the mattress was quite lumpy so this is going to make for some amazing sleep time with a brand spanking new mattress to sleep on.

Testing

Of course the younger ones had to test out big brother's bed... just to make sure that he was going to like it *grin*.

Hubby has one more bed to make for my daughter now and we were making plans today for how he might construct it. I want hers to be a little bit more girly so we're going to peruse the pre-made moldings at the lumber store next time we're in the city and see what we can incorporate into her foot and head boards. Maybe a poster bed with a frilly topped canopy might be nice to *grin*. No matter how he makes it I know she is just going to love whatever her daddy makes just for her :)

Hugs,
Rosina

Sunday, December 26, 2010

Handmade Holidays

Presents

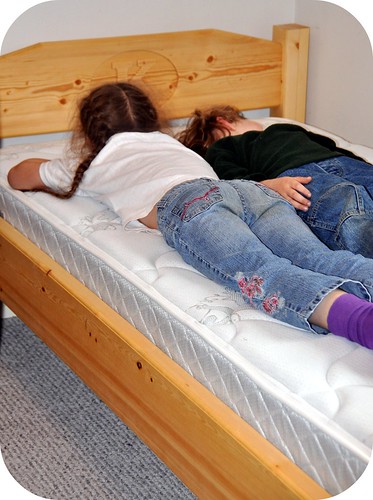
We had a wonderful Christmas together with family but I gotta say I'm sort of glad all of the pre-christmas mayhem is over! *grin*. I really planned to be ahead of the game when it came to all of my gift making and baking but somewhere along the way my schedule fell totally apart but now I can just sit back, relax and enjoy watching the children play with their new gifts :)

Fairy House

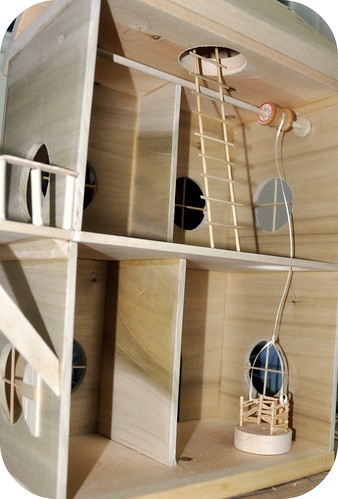
I had promised you more photos of the fairy house my son was making for his sister and here they are. I am SO proud of all the hard work he put into making it special for her. He keeps teasing me that it was really my project but I was just the creative director and he really did all the figuring :)

Working Elevator

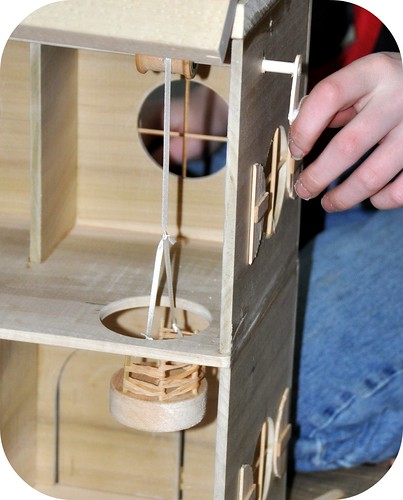
He rigged up the elevator so that when you crank the little handle on the outside of the house, the dowling on the ceiling spins and the ribbon winds up on the wooden thread spool lifting the elevator up through the hole in the floor and then there is a ladder that takes you up into the attic space :) LOVE it.

Windows

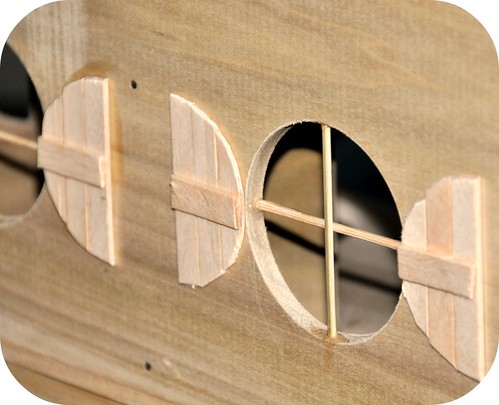
He used popsicle sticks to create the little shutters outside the windows...

Fairy House Doorway

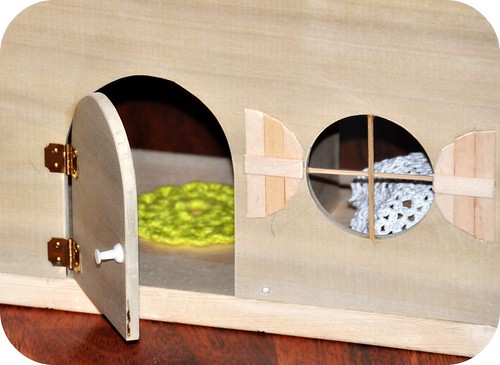
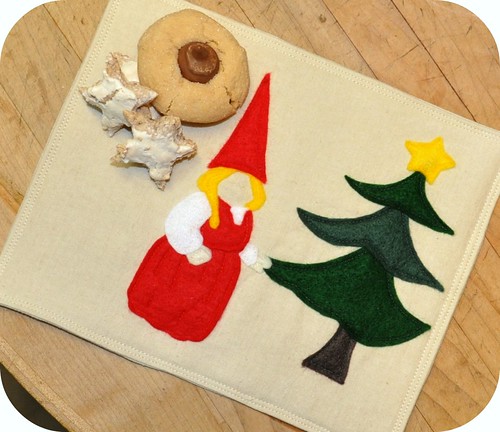
and here's the little doorway with one of the crocheted rugs I made inside :)

Fairy House Chandelier

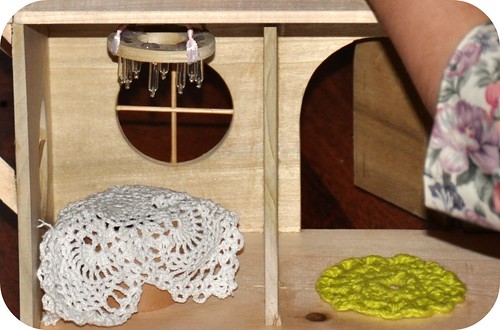
In the dining room we put a small table covered with a little crocheted doily underneath the chandelier :) We just need some chairs now and I'm going to let her help me decorate the windows with little lacey curtains and flower swags. She is so thrilled with it :)

Canadian Mincemeat

For my mom this year I made her a batch of Canadian Mincemeat using cranberries, maple syrup, port and other goodies and it turned out delicious! I was a little worried that it wouldn't turn out like the one she usually buys since I had never made it before but it was awesome :)

Bandit Mask

All of the kids got felt bandit masks which hubby is so graciously modeling for you *grin*....

Wooly mustache

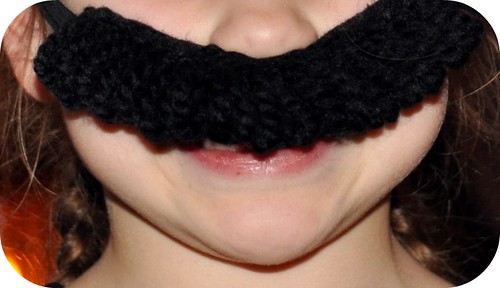
and an assortment of fun mustaches.
This is the crazy wooly one that I made looping thick black wool across the felt making it quite amusing :)

Big Lips

They also got hot lips and full beards to go with their pirate crowns I made them last Christmas :)

Lego Man wind up flashlight

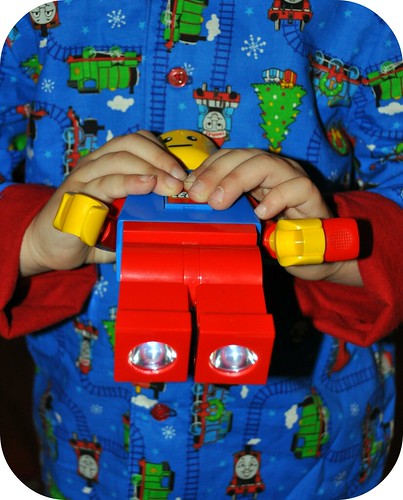
Along with all of the homemade gifts we always get them pajamas, socks, one book each and one gift that they really want within reason. So this year my little guy got a lego man flashlight that doesn't require any batteries. You just wind his arm around and around and it charges up the battery inside so he can fall asleep with it at night and we'll never have to replace any batteries! My oldest son got a model airplane to build and my little girl got the fairy house as her big gift because she actually had seen a plastic one that she liked but I thought wood would be so much better *grin*.

I hope you all had a wonderful Christmas as well and I can't believe that it is only days and we will be ringing in 2011!!

Hugs,
Rosina

Saturday, December 25, 2010

Merry Christmas

Merry Christmas

Merry Christmas
From our family to yours :)

Hugs,
Rosina

Tuesday, December 21, 2010

Yarn Along

A post of my current read and what is cast on my needles ~ Inspired by Ginny over at {Small Things}

Knitting Socks

I've been eyeing up the gorgeous socks that everyone has been making these last weeks on the yarn along posts and I finally just had to give it a try :)

I came across the ravelry pattern 'Most Basic Kids Socks', picked up this fun rainbow colored finger weight sock wool by Marks & Kattens and set to work trying to figure out just how to use a set of double pointed needles *grin*. Those are some tricky sticks! LOL

The first 13 rows were a basic knit, purl rib stitch and now I'm working on the 52 rows of straight knit which is going nice a quick but I'm finding it hard to steal little moments during the day to work on them so I think they will be my special project when we go and visit the inlaws. I always try to take something to occupy my time while we visit and this will be great! I just hope that I don't run into any problems with the pattern being a knitting newbie *grin*.

I'm still reading the Secret Garden but I also picked up a copy of Don't Make Me Count to Three by Ginger Plowman. I can't wait to have a peak inside of it but that will have to wait until after Christmas is over :)

Hugs,
Rosina

Monday, December 20, 2010

Trying To Slow Things Down

Miniature gingerbread house

The closer we get to Christmas the faster our days seem to be going despite my attempts of slowing things down. Hubby finally made it home for the holidays yesterday which is wonderful as that gives him a handful of precious days for family time and squeezing in any shopping or visiting before he heads back out on his tug the day after boxing day.

The children have been busy little bees making last minute gifts for each other and this year they decided that they would make coupon books for everyone. The little drawings are so cute, depicting chores such as helping with the weeding in the garden, housework, packing firewood, feeding the cows and the 'good for anything' coupon! Hubby was teasing them because that coupon was sort of like writing a blank check and who knows what it could be used for *grin*.

Enjoying our cookies

I've made great headway on my handmade gifts to :)

K finished the construction of the fairy house today and actually added a balcony accessible through a little round door and I got all of the little crocheted rugs finished along with a lacey tablecloth and am waiting for the glue to dry on the little hanging chandelier. My little gnome snack mats are finished and wrapped and I have a couple pairs of felted sweater slippers just waiting to have their tops crocheted so it's looking like I'm going to finish everything on time after all *grin*.

We've been enjoying our cookie stash in the freezer and our little gingerbread houses perched on our mugs of hot cocoa and I am so looking forward to Christmas eve. That is the night that we open our gifts, spend time with my mom, dad, sister and her husband and just relax enjoying one anothers company. The snow has began to fall again and it looks like were definitely going to have a white Christmas this year :)

Hugs,
Rosina

Saturday, December 18, 2010

Fairy House in Progress

Fairy House

As part of our handmade Christmas I had great plans for a little fairy house for my daughter but with Hubby being away for work so much this month I needed a new master builder *grin*. Thank goodness my oldest son loves to work with wood and he has taken on the job of building the house for her :) It is coming along fabulously! I had wanted to share newer photos of it today but when I went to take photos my camera battery was dead so I'll have to try and snap some more photos later to show you how it turns out!

fairy house

He's constructing it out of alder and pine wood and I thought that instead of just putting in square windows it would be fun to make them circular so we used my dad's hole cutting attachment for his drill and popped them out and added little room dividers so that she could create different little spaces after :)

The big highlight of the house is the elevator! See the hole in the bottom of the floor? Well that is actually the top floor and we have a little circular elevator that will drop through the floor down to the bottom level that is wound up and down on a wooden dowling and old wooden thread spool :) She is going to love it.

Fairy House

Today he finished putting the door on with tiny little brass hinges, all of the windows have little wooden crossbars dissecting them into 4 window panes and the shutters were in the process of being glued on :)

I'm in charge of making curtains, flower swags, crocheted carpets, plus I have a dandy idea for a little hanging chandelier. Now if only I had just a few more days.... christmas is just around the corner and I'm finally feeling the crunch!!!

How are your holiday projects coming along? Maybe I'll be the only one up till dawn the night before christmas eve finishing mine up LOL.

Hugs,
Rosina

Friday, December 17, 2010

Gingerbread Love

Miniature Gingerbread houses

Remember those adorable mini gingerbread houses I linked to a while back? Well I finally got a chance to make them and they are even cuter than I imagined!!

Mini Gingerbread houses

I must have spent a good portion of my morning hand cutting all of the doors, walls and roofs but it was surprisingly enjoyable *grin*. And the house smelled amazing with the scent of ginger, cinnamon and cloves. Those have to be some of the most festive holiday scents along with fresh cut cedar boughs :)

Miniature Gingerbread Houses

Even though some of my pieces were not exactly square the completed houses went together perfectly with the aid of the royal icing. Gotta love that stuff! It's so thick that you can mold it like putty and with the heat of the woodstove blazing beside us they dried within minutes :)

Miniature Gingerbread Houses

It was to late tonight for us to perch them on a hot mug of cocoa and nibble on their candy roofs as it was nearly bedtime but we sure are going to enjoy munching on a few of these this weekend :)

Did you get a chance to make some to? I'd love to have a peek at how you decorated yours :)

Hugs,
Rosina

Thursday, December 16, 2010

Gnome Snack Mats

Gnome Snack Mat

I love crafting with felt!

The creative possibilities are endless when you get going with it *grin*. In the winter edition of Rhythm of the Home is an article on making snack mats and I just fell in love with the idea of a special little mat for each child to enjoy a snack on :) So out came my giant stash of felt and linen fabrics and I set to work cutting out little Tomten.

Gnome Snack mat

Applique is sort of like a jigsaw puzzle as your fit your pieces together, overlapping edges, stitching them together...

Gnome Snack Mat

and watching the images appear :)

The original pattern called for a 7 x 9 inch square of linen but I decided to make it slightly larger at 8 x 10 inches because my tree and gnomes were a little bit larger than I had anticipated *grin*. Another thing that I did differently was that I stitched all of my felt pieces onto one single layer of linen so that all of my stitch work on the backside would be nicely hidden inside the layers of the mat and not visible on the backside of my finished mat like in the pattern. I just thought it looked tidier that way if someone happened to flip it over to check it out as all of the little stitched pieces made for quite a jumble :)

Gnome Snack Mat

I just love how they turned out!
So far I have just finished these two but I have one more boy gnome cut out and ready to be sewn and then I will have one for each of the children. I just know they are going to go crazy over them :)

Hugs,
Rosina


Looking for more crafty ideas or inspiration? Pop over to Natural Suburbia's Creative Friday and see what others are up to :)


Wednesday, December 15, 2010

right now, I AM

right now, I AM

....failing miserably at fighting off temptation!!

Mr. Snowman

Today I made mass amounts of icing for the children to decorate their sugar cookies with :) Oh what fun we had with sticky fingers, red and green m&m's and sprinkles. At one point my 4 year old was nearly naked as he had so much icing stuck to his shirt that we had to remove it LOL.

Cookies Galore

But now I have been left alone with an unguarded stash of the sweet little cookies and I'm having an awful hard time not taking a nibble every time I pass through the kitchen!

I am SO weak *grin*.

Hugs,
Rosina


right now I AM
Click the frog to learn more!

Tuesday, December 14, 2010

Yarn Along & Almond Star Cookie Recipe

A post of my current read and what is cast on my needles ~ Inspired by Ginny over at {Small Things}

Yarn Along

I finally cast on one of the leg warmers for my daughter this week but with all of the cookie making and holiday fun going on around here these days I didn't get very far *grin*. I have started a new book as well. The Forgotten Garden by Kate Morton. I'm only about 60 pages in but it is quite mysterious! The young child stow away, a grandmother full of secrets and a deed to a house an ocean away left to a very suprised granddaughter... how intriguing :)

Almond star cookies

Since my knitting was rather dull this week I thought that I would share my recipe for Almond Stars. These are one of our favorite recipes! They are little crunchy, sweet, one bite delights *grin*.

You will need:

3 egg whites
1 1/4 cups sugar
1 pkg. vanilla sugar (I use Dr. Oetker 9 gram pkg)
2 tsp. cinnamon
3 1/2 cups of ground almonds
icing sugar

Almond star cookies

Beat egg whites until soft peaks form. Add your sugar and vanilla sugar and beat until stiff peaks form. Set aside 1/4 cup of your egg mixture. You will use this later to brush the tops of your stars with for a little glaze :) Now fold the cinnamon and ground almonds into the remaining egg.

Roll out your dough 1/4 inch thick on a counter that you have heavily dusted with icing sugar and cut out stars rinsing your cookie cutter in hot water frequently to keep it from getting gummy. This dough is quite sticky when you first start but as you ball it up each time to re-roll for new stars you will find it will get much firmer and easier to work with. It is definitely worth the work though!

Almond star cookies

Spread a little bit of your reserved egg white on each of the stars and bake in a pre-heated oven at 300 degrees Fahrenheit for about 20 minutes. Store in an airtight container :)

My star cookie cutter is roughly an inch and a half wide and I got around 150 of these little guys this afternoon out of one batch of dough. They won't last long though *grin*.

Hope you like them :)

Hugs,
Rosina

Monday, December 13, 2010

Rolling Dough

sugar cookie dough

It was a wonderful day here today full of squishy cookie dough, floury fingers, cookie cutters and rolling pins :)

It was so nice to just pull out the chilled dough that I had made yesterday and let the children go to work. Usually we would mix up a batch and then it would have to be refrigerated and everyone would be anxiously waiting to begin but today it was instant fun.

Making cookies

I set up three stations on the kitchen counters for them so that they each had their own rolling pin, cookie sheet and tons of cookie cutters to use :)

Cutting out cookies

Star

We ended up with nearly 5 dozen cookies in all shapes and sizes. Some we ate, some are in the cookie tin and quite a few are in the freezer *grin*. We have visitors tomorrow so Wednesday looks like it will be the perfect day for phase two... icing! That always makes for some interesting messes *grin*.

Hugs,
Rosina